Windows に Apache2 + SSL 環境を構築
SSL対応の Apache 2.0 を入手する
| Apache2 (HTTP Server) | http://brandleadershipmarketing.com/apache/ |
Apache のサイトにある、Windows版のバイナリーは SSL に対応していないので自分でコンパイルしなおすか、上記サイトからバイナリーを入手します。コンパイルには、 Visual C++ が必要なのでここではコンパイル済みのバイナリーを入手します。
インストール
ダウンロードした ZIP ファイルを解凍し Windows のサービスとして登録します。ここでは、Apache_2.0.52-Openssl_0.9.7e-Win32.zip を Windows 2000 の C:\apache ディレクトリに解凍/インストールしています。
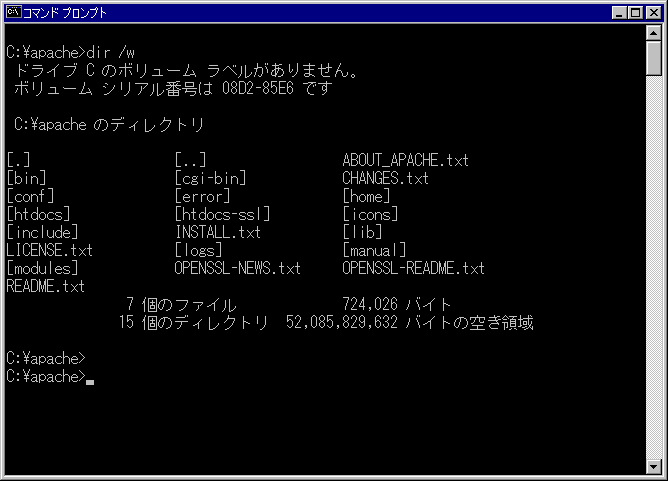
C:\apache> bin\apache -k install
証明書や認証キーの作成
商用利用するためには、本当に信頼のおける環境なのかを相手に証明するために、ベリサインのような公の認証機関が発行した証明書を利用します。証明書等を入手したら、Apache
の設定ファイル(C:\apache\conf\ssl.conf)を編集し登録します。
SSLCertificateFile
SSLCertificateKeyFile
ベリサインの証明書を登録する方法はここから。
しかし、経路暗号化のためだけに利用するならそれほどシリアスになる必要はありません。そこで、自分で証明した証明書を作って登録してしまいます。
【証明書の作成】
openssl コマンドを利用して公開鍵証明書作成、CSR(Certificate Signing Request:証明書要求)の作成、CSR に署名し apache に登録することで利用できるようになります。
証明書等はどこに作っても良いが、管理しやすいように C:\apahce\conf\ssl に作成します。openssl コマンドを起動する上で必要となる設定ファイル(openssl.conf)を作成します。以下は、サンプルなので運営方法に応じて設定を変更してください。
C:\apache> cd conf
C:\apache\conf> mkdir ssl
C:\apache\conf> cd ssl
C:\apache\conf\ssl> notepad openssl.conf
#
# SSLeay example configuration file.
# This is mostly being used for generation of certificate requests.
#

RANDFILE = .rnd
####################################################################
[ ca ]
default_ca = CA_default              # The default ca section

####################################################################
[ CA_default ]
dir = .                              # Where everything is kept
certs = $dir\certs                   # Where the issued certs are kept
crl_dir = $dir\crl                   # Where the issued crl are kept
database = $dir\index.txt            # database index file.
new_certs_dir = $dir\newcerts        # default place for new certs.

certificate = $dir\cacert.pem        # The CA certificate
serial = $dir\serial                 # The current serial number
crl = $dir\crl.pem                   # The current CRL
private_key = $dir\private\cakey.pem # The private key
RANDFILE = $dir\private\private.rnd  # private random number file

x509_extensions = x509v3_extensions  # The extentions to add to the cert
default_days = 365                   # how long to certify for
default_crl_days= 30                 # how long before next CRL
default_md = md5                     # which md to use.
preserve = no                        # keep passed DN ordering

# A few difference way of specifying how similar the request should look
# For type CA, the listed attributes must be the same, and the optional
# and supplied fields are just that :-)
policy = policy_match

# For the CA policy
[ policy_match ]
countryName = optional
stateOrProvinceName = optional
organizationName = optional
organizationalUnitName = optional
commonName = supplied
emailAddress = optional

# For the 'anything' policy
# At this point in time, you must list all acceptable 'object'
# types.
[ policy_anything ]
countryName = optional
stateOrProvinceName = optional
localityName = optional
organizationName = optional
organizationalUnitName = optional
commonName = supplied
emailAddress = optional

####################################################################
[ req ]
default_bits = 1024
default_keyfile = privkey.pem
distinguished_name = req_distinguished_name
attributes = req_attributes

[ req_distinguished_name ]
countryName = Country Name (2 letter code)
countryName_min = 2
countryName_max = 2

stateOrProvinceName = State or Province Name (full name)

localityName = Locality Name (eg, city)

0.organizationName = Organization Name (eg, company)

organizationalUnitName = Organizational Unit Name (eg, section)

commonName = Common Name (eg, your website's domain name)
commonName_max = 64

emailAddress = Email Address
emailAddress_max = 40

[ req_attributes ]
challengePassword = A challenge password
challengePassword_min = 4
challengePassword_max = 20

[ x509v3_extensions ]
# under ASN.1, the 0 bit would be encoded as 80
nsCertType = 0x40

#nsBaseUrl
#nsRevocationUrl
#nsRenewalUrl
#nsCaPolicyUrl
#nsSslServerName
#nsCertSequence
#nsCertExt
#nsDataType
C:\apache\conf\ssl> \apache\bin\openssl req -config openssl.conf -new -out my-server.csr
Loading 'screen' into random state - done
Generating a 1024 bit RSA private key
.......++++++
........++++++
writing new private key to 'privkey.pem'
Enter REM pass  phrase:<パスフレーズ>
Verifying - Enter PEM pass phrase:<パスフレーズ>
-----
You are about to be asked to enter information that will be incorporated
into your certificate request.
What you are about to enter is what is called a Distinguished Name or a DN.
There are quite a few fields but you can leave some blank
For some fields there will be a default value,
If you enter '.', the field will be left blank.
-----
Country Name (2 letter code) []:JP
State or Province Name (full name) []:Tokyo
Locality Name (eg, city) []:Tokyo
Organization Name (eg, company) []:Example Inc.
Organizational Unit Name (eg, section) []:Baz Section
Common Name (eg, your websites domain name) []:www.example.com
Email Address []:master@example.com

Please enter the following 'extra' attributes
to be sent with your certificate request
A challenge password []:<Enter>

C:\apache\conf\ssl> \apache\bin\openssl rsa -in privkey.pem -out my-server.key
Enter pass phrase for privkey.pem:<パスフレーズ>
writing RSA key

C:\apache\conf\ssl> \apache\bin\openssl x509 -in my-server.csr -out my-server.cert -req -signkey my-server.key -days 365
Loading 'screen' into random state - done
Signature ok
subject=/C=JP/ST=Tokyo/L=Tokyo/O=Example Inc./OU=Baz Section/CN=www.example.com/emailAddress=master@example.com
Getting Private key
 (Internet Explorer 4.x を利用するユーザーを抱えている場合、DER-encoded バージョンを作成)
C:\apache\conf\ssl> \apache\bin\openssl x509 -in my-server.cert -out my-server.der.crt -outform DER
| Country Name | 2文字の国コードを入力 |
| State or Province Name | 州、県の名前を入力(CAのように省略しない) |
| Locality Name | 市の名前を入力 |
| Organization Name | 組織の名称を入力(特殊な文字はなるべく避ける & -> and) |
| Organizational Unit Name | セクション名を入力 |
| Common Name | サーバーの別名ではなく、セキュアサーバーの本当の名前(有効なDNS名)を入力 |
| Email Address | Webマスターやシステム管理者の電子メールアドレスを入力 |
設定
Apache をの設定ファイル(C:\apache\conf\httpd.conf)を調整します。
| ディレクティブ | 説明 |
ServerRoot |
Apache のトップディレクトリを指定します。 (C:\apache) |
Listen |
httpd (HTTPサーバー) が、監視するポートを指定します。 |
User |
httpd (HTTPサーバー)を起動するときのオーナーを指定します。 |
Group |
httpd (HTTPサーバー)を起動するときの group を指定します。#-1 に設定されていてうまく動作しないときがあるので、nobody など実際に許可を与えたいグループに設定します。 |
ServerName |
httpd (HTTPサーバー)を起動するホストとポートを指定します。DNS に登録されていない場合、IP Address を指定します。 |
DocumentRoot |
Webページのトップディレクトリを指定します。(C:\apache\htdocs) |
DefaultLanguage |
デフォルト言語を指定します。(ja) |
LanguagePriority |
言語リストの順番を指定します。(ja en da nl et fr de el it kr no pl pt pt-br ltz ca es sv tw) |
AddDefaultCharset |
デフォルトの charset を指定します。(SHIFT_JIS) |
| LoadModule | SSL用モジュールを有効にします。(LoadModule ssl_module modules/mod_ssl.so) |
【作成したキーを Apache に登録】
作成した証明書や認証キーにあわせて Apache の設定ファイル(C:\apache\conf\ssl.conf)を編集します。
SSLCertificateFile conf/ssl/my-server.cert
SSLCertificateKeyFile conf/ssl/my-server.key
として証明書等を登録することができます。
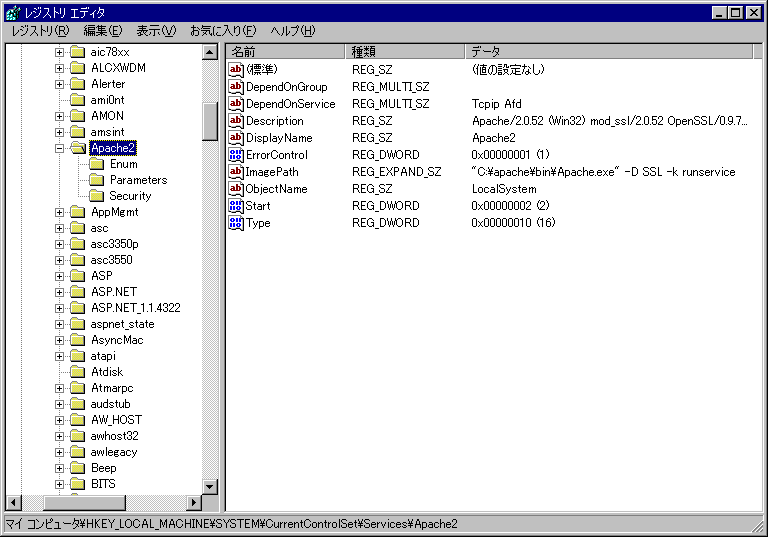
インストールセクションで、apache をサービスとして登録(apache -k install)しました。 しかし、そのままでは SSLのサービスを有効にすることはできません。そこで、regedit コマンドを利用して HKEY_LOCAL_MACHINE\SYSTEM\CurrentControlSet\Services\Apache2 の ImagePath を修正します。
"C:\apache\bin\Apache.exe" -D SSL -k runservice
サービスで、スタートアップの種類を自動に設定することで OS 起動時に自動的に Apache が起動されます。

動作確認
実際にブラウザーからサーバーにアクセスし、SSL が機能しているか確認します。ここで、注意することがあります。通 常、URL は http://www.example.com/ と指定しますが、SSL の場合、https://www.example.com/ というふうに httpsとなります。これまでの設定では、通信中のデータを暗号化する程度に利用するなら問題ないが、クレジット番号を利用するような場合、ベリサインのようなそれなりに信用のある機関に証明書を発行してもらう必要があります。