SSL対応 Apache(Apache-SSL編)
Secure Sockets Layer (SSL)
ブラウザーと Web サーバー(httpd)との通信は、Hyper Text Transfer Protcol (HTTP) と呼ばれるプロトコルでデータをやり取りします。しかし、生データが流れるためインターネットショッピング等をする際に、個人情報が漏れるなどセキュリティー上不具合が生じます。そこで、データを暗号化する Secure Sockets Layer (SSL)という仕組みが考えられました。
Apache を SSL対応にするために必要なモジュール
http://www.apache.org/dist/apache_1.3.9.tar.gz
ftp://ftp.ox.ac.uk/pub/crypto/SSL/Apache-SSL/apache_1.3.9+ssl_1.37.tar.gz (http://www.apache-ssl.org/)
http://www.openssl.org/source/openssl-0.9.4.tar.gz
上記のモジュールをダウンロードして SSL対応の Apache を作る場合、ソースそのものが改ざんされていないかチェックしておく必要があります。PGP
Signatures が用意されているので、 PGPを利用して改ざんされていないかモジュールを調べておくことをお勧めします。
インストール方法
まず、はじめに OpenSSL をインストールする必要があります。 デフォルトコンフィグレーションでは、/usr/local/ssl (/var/ssl) ディレクトリーに各モジュールがインストールされます。
# gzip -dc openssl-0.9.4.tar.gz | tar xf -
# cd openssl-0.9.4
# ./config
# make
# make test
# make install
# cd ..                  注意:この時点で make clean は実行しないでね!
次に Apache のソース(apache_1.3.9.tar.gz)を展開し、apache に SSL機能を付加するための module の追加を行います。
# gzip -dc apache_1.3.9.tar.gz | tar xf - # cd apache_1.3.9 # gzip -dc ../apache_1.3.9+ssl_1.37.tar.gz | tar xf -ケース1)OpenSSL のインストールでデフォルトコンフィグレーションの場合、FixPatch スクリプトを実行し、続いて configure スクリプトを実行します。 もし、apache 自身のコンフィグレーションを変更したい場合、configure スクリプトを起動する前に 「HTML と CGIの仕組み」を参照して下さい。
# sh ./FixPatch
Searching for a usable OpenSSL installation or source directory
SSLeay sources were found in: /usr/local/src/openssl-0.9.4
Using the source version of SSLeay found in /usr/local/src/openssl-0.9.4

If this is not what you want stop now and specify the path to SSLeay
explicitly.

Your version of patch is OK.
Do you want me to apply the fixed-up Apache-SSL patch for you? [n] y
patching file `Makefile.tmpl'
patching file `configure'
patching file `src/Configuration'
patching file `src/Configuration.tmpl'
patching file `src/Configure'
patching file `src/Makefile.tmpl'
patching file `src/include/ap_config.h'
patching file `src/include/buff.h'
patching file `src/include/http_main.h'
patching file `src/include/httpd.h'
patching file `src/main/Makefile.tmpl'
patching file `src/main/buff.c'
patching file `src/main/http_log.c'
patching file `src/main/http_main.c'
patching file `src/main/util_script.c'
patching file `src/modules/standard/mod_log_config.c'
patching file `src/support/apachectl'
patching file `src/support/suexec.c'
# ./configure
# make
# make install
ケース2)OpenSSL モジュールのインストール先を変更した場合、patch コマンドで SSLpatch をあて、 src/Configuration.tmpl ファイル中の OpenSSL に関する項目を調整する必要があります。これは、昔のバージョンやり方なのでやらない方がいいね。このケース2は無視してケース1を実行し、次の「設定ファイルの編集」を行ってください。それなら消しておけという話もあるけど....メモだから...
# patch -p1 < SSLpatch # vi src/Configuration.tmpl【この色が変更部分】
# Config file for the Apache httpd.

# Configuration.tmpl is the template for Configuration. Configuration should
# be edited to select the modules to be included as well as various flags
# for Makefile.

# The template should only be changed when a new system or module is added,
# or an existing one modified. This will also most likely require some minor
# changes to Configure to recognize those changes.

...

################################################################
# Makefile configuration
#
# These are added to the general flags determined by Configure.
# Edit these to work around Configure if needed. The EXTRA_* family
# will be added to the regular Makefile flags. For example, if you
# want to compile with -Wall, then add that to EXTRA_CFLAGS. These
# will be added to whatever flags Configure determines as appropriate
# and needed for your platform.
#
# You can also set the compiler (CC) and optimization (OPTIM) used here as
# well.  Settings here have priority; If not set, Configure will attempt to
# guess the C compiler, looking for gcc first, then cc.
#
# Optimization note:
# Be careful when adding optimization flags (like -O3 or -O6) on the OPTIM
# entry, especially when using some GCC variants. Experience showed that using
# these for compiling Apache is risky. If you don't want to see Apache dumping
# core regularly then at most use -O or -O2.
#
# The EXTRA_DEPS can be used to add extra Makefile dependencies to external
# files (for instance third-party libraries) for the httpd target. The effect
# is that httpd is relinked when those files are changed.
#
EXTRA_CFLAGS=
EXTRA_LDFLAGS=
EXTRA_LIBS=
EXTRA_INCLUDES=
EXTRA_DEPS=

#CC=
CC=gcc
#CPP=
#OPTIM=
#RANLIB=

TARGET=httpsd

#
# SSL Related stuff. N.B. This is set up to use the SSLeay source, NOT an
# installed version.
#
#SSL_BASE=/u/ben/work/scuzzy-ssleay6
SSL_BASE=/usr/local/ssl
SSL_INCLUDE= -I$(SSL_BASE)/include
SSL_CFLAGS= -DAPACHE_SSL
SSL_LIB_DIR= $(SSL_BASE)/lib
SSL_LIBS= -L$(SSL_LIB_DIR) -lssl -lcrypto
SSL_APP_DIR= $(SSL_BASE)/bin
SSL_APP=/usr/local/ssl/bin/openssl

...
# ./configure
# make
# make install
設定ファイル httpsd.confの編集
通常の Apache では、httpd.conf というファイルが設定ファイルとなるが、SSL 対応の Apache では httpsd.conf というファイルになります。先程、展開した apache_1.3.9+ssl_1.37.tar.gz に含まれるサンプルをもとに設定ファイルを作成します。
# vi /usr/local/apache/conf/httpsd.conf
【この色が変更部分】
# This is an example configuration file for Apache-SSL.
# Copyright (C) 1995,6,7,8,9 Ben Laurie

# By popular demand, this file now illustrates the way to create two websites,
# one secured (on port 8887), the other not (on port 8888).

# You may need one of thse
#User ben
#Group ben
User nobody
Group nobody

LogLevel debug

# If built with --enable-shared=max...
#LoadModule auth_module /home/ben/.../modules/standard/mod_auth.so
#LoadModule config_log_module /home/ben/.../modules/standard/mod_log_config.so
#LoadModule cgi_module /home/ben/.../modules/standard/mod_cgi.so
#LoadModule alias_module /home/ben/.../modules/standard/mod_alias.so

# Disable CA list sending for testing...
#SSLNoCAList

# Load some randomness.
# This is loaded at startup, reading at most 1024 bytes from /dev/random
# The randomness will be _shared_ between all server instances. You can have
# as many of these as you want.
#SSLRandomFile /dev/random 1024
# And this one will be loaded before SSL is negotiated for each connection.
# Again, you can have as many of these as you want, and they will all be used
# at each connection.
#SSLRandomFilePerConnection /dev/random 1024


# SSL Servers MUST be standalone, currently.
ServerType standalone

# The default port for SSL is 443...
#Port 8887
#Listen 8887
#Listen 8888
Port 443

# My test document root
#DocumentRoot /home/ben/www/docs
#DocumentRoot /home/ben/apache-ssl/apache_1.3.4-ssl/htdocs
DocumentRoot /usr/local/apache/htdocs

#<Directory /home/ben/apache-ssl/apache_1.3.4-ssl/htdocs/manual>
<Directory /usr/local/apache/htdocs/manual>
# This directive forbids access except when SSL is in use. Very handy for
# defending against configuration errors that expose stuff that should be
# protected
SSLRequireSSL

# Use these here if renegotiation is permitted
#SSLVerifyClient 2
SSLVerifyClient 0
#SSLVerifyDepth 2

#AuthType Basic
#AuthName Experimental
#AuthGroupFile /dev/null
#AuthUserFile /home/ben/www/users
#require valid-user
</Directory>

# Watch what's going on
#TransferLog logs/transfer_log
TransferLog /usr/local/apache/logs/transfer_log

# Note that all SSL options can apply to virtual hosts.

# Disable SSL. Useful in combination with virtual hosts. Note that SSLEnable is
# now also supported.
#SSLDisable
SSLEnable

# Set the path for the global cache server executable.
# If this facility gives you trouble, you can disable it by setting
# CACHE_SESSIONS to FALSE in apache_ssl.c
#SSLCacheServerPath ../src/modules/ssl/gcache
SSLCacheServerPath /usr/local/apache/bin/gcache

# Set the global cache server port number, or path. If it is a path, a Unix
# domain socket is used. If a number, a TCP socket.
#SSLCacheServerPort logs/gcache_port
SSLCacheServerPort /usr/local/apache/logs/gcache_port
#SSLCacheServerPort 1234

# Directory for the cache server to run in (in case of crashes). Optional.
SSLCacheServerRunDir /tmp

# Set the session cache timeout, in seconds (set to 15 for testing, use a
# higher value in real life)
SSLSessionCacheTimeout 15

# Set the CA certificate verification path (must be PEM encoded).
# (in addition to getenv("SSL_CERT_DIR"), I think).
#SSLCACertificatePath /home/ben/apache-ssl/apache_1.3.4-ssl/SSLconf/conf

# Set the CA certificate verification file (must be PEM encoded).
# (in addition to getenv("SSL_CERT_FILE"), I think).
#SSLCACertificateFile /some/where/somefile
#SSLCACertificateFile /home/ben/apache-ssl/apache_1.3.4-ssl/SSLconf/conf/httpsd.pem

# Point SSLCertificateFile at a PEM encoded certificate.
# If the certificate is encrypted, then you will be prompted for a pass phrase.
# Note that a kill -1 will prompt again.
# A test certificate can be generated with "make certificate".
#SSLCertificateFile /home/ben/apache-ssl/apache_1.3.4-ssl/SSLconf/conf/httpsd.pem
SSLCertificateFile /usr/local/apache/conf/httpsd.pem
#SSLCertificateFile /u/ben/apache/apache_1.2.6-ssl/SSLconf/conf/t1.pem


# If the key is not combined with the certificate, use this directive to
# point at the key file. If this starts with a '/' it specifies an absolute
# path, otherwise it is relative to the default certificate area. That is, it
# means "<DEFAULT>/private/<KEYFILE>".
#SSLCertificateKeyFile /some/place/with/your.key

# Set SSLVerifyClient to:
# 0 if no certicate is required
# 1 if the client may present a valid certificate
# 2 if the client must present a valid certificate
# 3 if the client may present a valid certificate but it is not required to
#   have a valid CA
SSLVerifyClient 2
# How deeply to verify before deciding they don't have a valid certificate
SSLVerifyDepth 10

# If you have enabled client cert exports (in buff.h) you need to use
# SSLExportClientCertificates to enable them. Note that the server still has to
# mess about with certs even if this is disabled (and exports are enabled)
# because the cert chain is received before we can know whether it is needed or
# not.
<Location /scripts>


#SSLExportClientCertificates
</Location>


# Translate the client X509 into a Basic authorisation. This means that the
# standard Auth/DBMAuth methods can be used for access control. The user name
# is the "one line" version of the client's X509 certificate. Note that no
# password is obtained from the user. Every entry in the user file needs this
# password: xxj31ZMTZzkVA. See the code for further explanation.
SSLFakeBasicAuth

# List the ciphers that the client is permitted to negotiate. See the source
# for a definitive list. For example:
#SSLRequiredCiphers RC4-MD5:RC4-SHA:IDEA-CBC-MD5:DES-CBC3-SHA

# These two can be used per-directory to require or ban ciphers. Note that (at
# least in the current version) Apache-SSL will not attempt to renegotiate if a
# cipher is banned (or not required).
# You should probably at least ban the null encryption ciphers.
#SSLRequireCipher
#SSLBanCipher NULL-MD5:NULL-SHA

# A home for miscellaneous rubbish generated by SSL. Much of it is duplicated
# in the error log file. Put this somewhere where it cannot be used for symlink
# attacks on a real server (i.e. somewhere where only root can write).
# Don't use this anymore! Now everything is logged in the error log.
#SSLLogFile /tmp/ssl.log

# Custom logging
#CustomLog logs/ssl_log "%t %{version}c %{cipher}c %{clientcert}c"
CustomLog       /usr/local/apache/logs/ssl_log "%t %{version}c %{cipher}c %{clientcert}c"

#<VirtualHost heap:8888>
#SSLDisable
#SSLEnable
#</VirtualHost>

# If you want, you can disable SSL globally, and enable it in a virtual host...
#<VIRTUALHOST HEAP:8887>
#SSLEnable
# and the rest of the SSL stuf...
#</VIRTUALHOST>

# Experiment with authorization...
#<DIRECTORY /U/BEN/WWW/1/DOCS>
#AuthType Basic
#AuthName Experimental
#AuthGroupFile /dev/null
#AuthUserFile /u/ben/www/1/users
#<LIMIT PUT GET>
#allow from all
#require valid-user
#</LIMIT>
#</DIRECTORY>

#ScriptAlias     /scripts        /home/ben/www/scripts
サンプルを上記のように作り直すやり方もあるが、SSL対応前の Apache のサンプルである httpd.conf に、上記のコメントでない部分を追加するほうが細かい設定(サンプルはここ)が行えます。
コンフィグレーションファイルから、SSL に関する部分だけを一部取り出して説明します。
# HTTPS のデフォルトのポート番号
Port 443

# ログの設定
#   アクセス時間、バージョン、暗号、ダイジェストの方式、クライアントを記録
LogFormat "%t %{version}c %{cipher}c %{clientcert}c" ssl
CustomLog /usr/local/apache/logs ssl

# Global Cache の設定
#   SSL セッションキーの交換に時間がかかるので、キャッシュして再利用するプログラム
SSLCacheServerPath /usr/local/apache/lib/gcache
SSLCacheServerPort /usr/local/apache/logs/gcache_port
SSLSessionCacheTimeout 3600

# 証明書とキー(それぞれ異なるファイルなら分ける)
SSLCertificateFile /usr/local/apache/conf/httpsd.pem
#SSLCertificateKeyFile /usr/local/apache/conf/httpsd.pem

# クライアント認証
#   0: クライアントは証明書を提示しない(サーバー認証だけ行う場合も)
#   1: 有効な証明書を提示するかもしれない。証明書は、合法的な認証局(CA)が発行したもので
#      なければならない。
#   2: 有効な証明書を提示しなければならない。
#   3: 有効な証明書を提示するかもしれない。証明書は、合法的な認証局(CA)が発行したもので
#      なくてもよい。
SSLVerifyClient 0

# ディレクトリーに関する制限
<Directory "/usr/local/apache/htdocs">
    Options None
    AllowOverride None
    Order Deny, Allow
    Allow from all
    # 以下の行を追加すると、SSLでない接続はアクセスを拒否
    SSLRequireSSL
</Directory>
通常なら、標準の Apache と SSL対応の Apache の二種類の設定ファイルを用意してサーバーを別々に起動しなければなりません。しかし、Apache
の Virtual Host という機能を利用することで、一つのコンフィグレーションファイル(httpsd.conf)で
SSLのサービスと通常の WWW サービスの両方を記述することができます。
共通のサービスをはじめに記述し、それぞれ異なる部分を <VirtualHost>タグを利用して記述します。以下では、それぞれ異なるホスト名を指定していますが、同一ホスト名(ServerNameで指定済み)で、SSL対応/非対応のサーバーを立ち上げるなら、ホスト名を指定する部分に
_default_ と記述します。<VirtualHost _default_:80> ..... <VirtualHost
_default_:443>
Port 80
Listen 80
Listen 443

ServerType standalone
共通の設定
...

<VirtualHost www.foobar.co.jp:80>
SSLDisable
通常サービスの設定
...
</VirtualHost>
<VirtualHost www.ssl.foobar.co.jp:443>
SSLEnable
DocumentRoot /usr/local/apache/htdocs-ssl
ServerAdmin webmaster@foobar.co.jp
ServerName www.ssl.foobar.co.jp
SSLCACertificatePath /usr/local/apache/...
SSLCACertificateFile /usr/local/apache/...
SSLCertificateFile /usr/local/apache...
SSLLogFile /usr/local/apache/...
SSLVerifyClient 0
SSLのサービスの設定
...
</VirtualHost>
認証キーの作成
SSLサーバーとして認証を得るため、認証キーを作成します。# cd ./src # make certificate【この色が入力部分】
# make certificate
/usr/local/ssl/bin/openssl req -config ../SSLconf/conf/ssleay.cnf \
-new -x509 -nodes -out ../SSLconf/conf/httpsd.pem \
-keyout ../SSLconf/conf/httpsd.pem; \
ln -sf httpsd.pem ../SSLconf/conf/`/usr/local/ssl/bin/openssl \
x509 -noout -hash < ../SSLconf/conf/httpsd.pem`.0


Using configuration from ../SSLconf/conf/ssleay.cnf
unable to load 'random state'
What this means is that the random number generator has not been seeded
with much random data.
Consider setting the RANDFILE environment variable to point at a file that
'random' data can be kept in.
Generating a 1024 bit RSA private key
..............+++++
.................+++++
writing new private key to '../SSLconf/conf/httpsd.pem'
-----
You are about to be asked to enter information that will be incorporated
into your certificate request.
What you are about to enter is what is called a Distinguished Name or a DN.
There are quite a few fields but you can leave some blank
For some fields there will be a default value,
If you enter '.', the field will be left blank.
-----
Country Name (2 letter code) [GB]:JP
State or Province Name (full name) [Some-State]:Tokyo
Locality Name (eg, city) []:Tokyo
Organization Name (eg, company; recommended) []:FooBar Corp.
Organizational Unit Name (eg, section) []:Baz Section
server name (eg. ssl.domain.tld; required!!!) []:www.ssl.foobar.co.jp
Email Address []:webmaster@foobar.co.jp
#
# cp ../SSLconf/conf/httpsd.pem /usr/local/apache/conf/
※ 証明書やキーを再度作成する方法(/usr/local/ssl/bin/openssl コマンドを利用)
これまで設定した内容に沿ってキーや証明書を再度作成する場合
# openssl req -new -x509 -nodes -out httpsd.pem -keyout httpsd.pem -days 30
# cp httpsd.pem /usr/local/apache/conf/

キーと証明書を別々に作成し、有効期限を 60 日にする場合(設定ファイル httpsd.conf の変更が必要)
証明書(cert.pem) とキー(key.pem) は設定ファイルに指定したファイル名で作成します。
# openssl req -new -x509 -nodes -out cert.pem -keyout key.pem -days 60
サーバーの起動
やはり、Apache を起動させる際の apachectl コマンドとは異なり、httpsdctl というコマンドを使用します。コマンドラインオプションは同一で start, stop などを利用できます。# /usr/local/apache/bin/httpsdctl start
動作確認
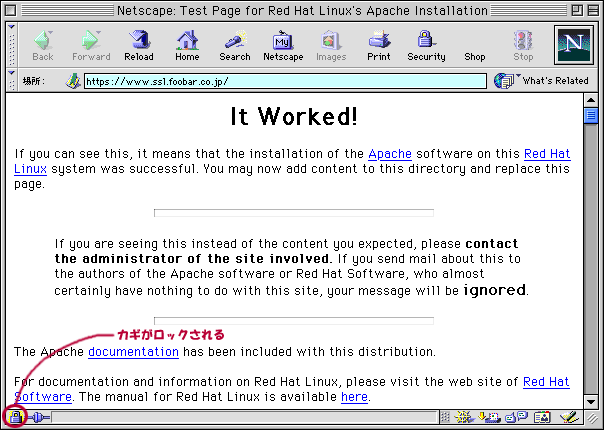
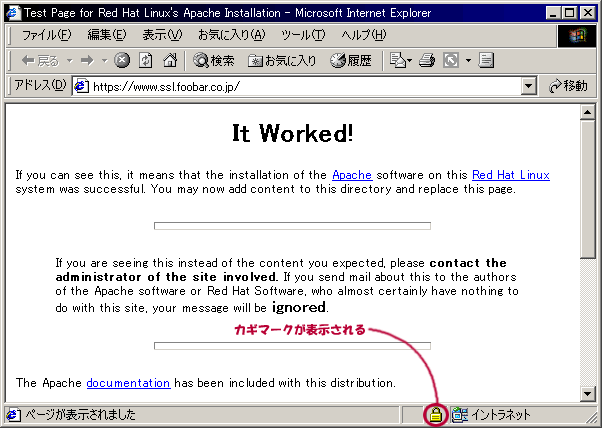
実際にブラウザーからサーバーにアクセスし、SSL が機能しているか確認します。ここで、注意することがあります。通 常、URL は http://www.foobar.co.jp/ と指定しますが、SSL の場合、https://www.ssl.foobar.co.jp/ というふうに httpsとなります。これまでの設定では、通信中のデータを暗号化する程度に利用するなら問題ないが、クレジット番号を利用するような場合、ベリサインのようなそれなりに信用のある機関に証明書を発行してもらう必要があります。
【Netscape Navigator/Communicator の場合】

【Internet Explorer の場合】


