PHP - テンプレートエンジンの導入!
PHPでは、HTMLページ内に<?php ?>タグで括る事によって、 HTML(デザイン部分)とプログラム(ロジック部分)を同一ページに記述できます。しかし、同じファイル内にデザイン部分とロジック部分を記述するとメンテナンスが非常に困難となります。Java でも JSP で同じような問題が発生し、JSP 2.0 でカスタムタグの導入により ロジック部を分離することができ、Struts というフレームワークまで生まれました。
PHP では、Template Engine という技術によってデザイン部分とロジック部分を分離させメンテナンスを向上させることができるようになりました。このことで、デザイナーとプログラマーが同時に作業を行えるようにもなりました。この Template Engine は、それほど作るのに難しくはありません。しかし、自分で創って自分でメンテナンスしていくのは大変というのであれば、いくつかネット上で公開されているものがあります。どれもそれぞれ特徴があり、どれを利用するかは自分に適したものを利用すると良いでしょう。
ここでは、ネットで公開されている Template Engine のなかで広く使われている Smarty と patTemplate を紹介します。この二つの Template Engine の違いは、開発者の視点で開発されている Smarty に対して、デザイナーの視点で開発されている patTemplate かな?
これらを導入する場合、PHP のバージョンに注意してください。また、以降の説明は PHP がインストールされており、利用できる環境でなければなりません。PHP のパッケージは /usr/local にインストールされていると仮定しています。
Smarty
Template Engine の入手
Smarty は、http://smarty.php.net/ のダウンロードサイトから入手できます。入手したアーカイブを展開すると、libs というディレクトリーに Smarty のライブラリが入っています。このライブラリは、Smarty を利用する全ての Webアプリケーションで共有します。 Smartyをアップデートする場合、このディレクトリーにあるファイルを入れ替えることで最新の Smarty になります。
インストール
Smarty のライブラリは、どこに置いても構いませんが PHP がサーチできるパス (include_path)に置くか、インストールしたディレクトリを php.ini の include_path に追加すると良いでしょう。 ここでは、include_path = ".:/usr/local/lib/php" となっているとして、/usr/local/lib/php/Smarty にライブラリをインストール(コピー)します。
# gzip -dc Smarty-2.6.2.tar.gz | tar xf -
# cd Smarty-2.6.2/libs
# mkdir /usr/local/lib/php/Smarty
# tar cf - . | (cd /usr/local/lib/php/Smarty/; tar xf -)
Smarty を利用する場合、libs ディレクトリ内の構成が改変されていなければ、基本的に Smarty.class.phpファイルさえ見つけられればライブラリを利用することが出来るようになります。
Smarty の利用
Smarty を利用する場合、はじめに Smarty.class.phpを読み込みます。そして、Smarty のインスタンスを生成することで利用可能になります。
require_once('Smarty/Smarty.class.php');
$smarty = new Smarty;
PHP で include_path = ".:/usr/local/lib/php" と設定してあり、/usr/local/lib/php/Smarty ディレクトリにライブラリをインストールしたので上記のように Smarty.class.phpを読み込みます。
どうしても、 Smarty.class.php が No such file or directory となる場合、SMARTY_DIR に Smarty.class.phpのあるディレクトリを設定する必要があります。SMARTY_DIR は、終わりに必ずスラッシュを含める必要があります。
define('SMARTY_DIR','/usr/local/lib/php/Smarty/');
require_once(SMARTY_DIR.'Smarty.class.php');
$smarty = new Smarty;
Smartyは、Smarty.class.phpファイルさえ見つけられれば利用可能になるので。libs ディレクトリ内の構成を変更せずに適当なディレクトリにライブラリを置き、Smarty.class.phpファイルをフルパスで指定[ require_once('/usr/local/lib/php/Smarty/Smarty.class.php'); ] しても動作します。
ライブラリファイルが正常に設置できたなら、次は、実際に作成するアプリケーションのために Smarty用のディレクトリを設定しなければなりません。Smartyは、templates, templates_c, configs という三つのディレクトリを用意しなければなりません。もし、ページの描画を高速化する built-in caching という機能を有効にした場合、cacheというディレクトリも必要です。
templates |
テンプレートファイルを格納するディレクトリ。各テンプレートファイルの拡張子は .tpl。 |
templates_c |
テンプレートファイルを利用して php ファイルに展開されたファイルを格納するキャッシュ用ディレクトリ。Webサーバー(httpd)がファイルを作成するので、httpd.conf で設定されている Webサーバーを起動するアカウント(User, Group)が書き込みできるオーナーとパーミッションにしなければなりません。
例) chown nobody:nobody templates_c
chmod 770 templates_c |
configs |
テンプレートなどを利用する際の設定や初期値などを登録するファイルを格納するディレクトリ。
設定ファイルが test.conf という名前の場合、テンプレートファイル内で以下のように利用します。
--- test.conf ------------------------------ # global pageTitle = "Mail Page" bodyBgColor = "#FFFFFF" [Sub] = "Sub Page" --------------------------------------------- --- template for main --------------------- {config_load file="test.conf"} <html> <title>{#pageTitle#}</title> <body bgcolor="{#bodyBgColor#}"> ... --------------------------------------------- --- template for sub ---------------------- {config_load file="test.conf" section="Sub"} <html> <title></title> <body bgcolor="{#bodyBgColor#}"> ... --------------------------------------------- |
cache |
built-in caching という機能を有効($smarty->caching = true;)にした際に使用されるキャッシュ用ディレクトリ。Webサーバー(httpd)がファイルを作成するので、httpd.conf で設定されている Webサーバーを起動するアカウント(User, Group)が書き込みできるオーナーとパーミッションにしなければなりません。
例) chown nobody:nobody cache
chmod 770 cache |
Smarty用ディレクトリは、デフォルトのままではアプリケーションを構成するファイルと同じディレクトリに置きます。たとえば、以下のようになります。アプリケーションのメインである index.php の場所に注目してください。
ドキュメントルート ---+--- index.html
                      |
                      +--- SampleApp/ ---+--- index.php
                                         |
                                         +--- templates/
                                         |
                                         +--- templates_c/
                                         |
                                         +--- configs/
                                         |
                                         +--- cache/
ここで、きちんと Smarty が動作するかサンプルを作ってみましょう。以下の内容で、ロジック・ファイルindex.php を作成:
<?php
require_once('Smarty/Smarty.class.php');

// create object
$smarty = new Smarty;

// assign some content.
$smarty->assign('name', 'Shinta');
$smarty->assign('url', 'http://www.my-domain.com/');

// display it
$smarty->display('index.tpl');

?>
以下の内容で、テンプレート・ファイル index.tpl を作成:
<html>
<head>
<meta http-equiv="Content-Type" content="text/html; charset=EUC-JP">
<title>User Info</title>
</head>
<body>

<p>ユーザー情報:</p>
名前:{$name}<br>
URL: <a href="{$url}">{$url}</a><br>
日付:{$smarty.now|date_format:"%Y年%m月%d日"}<br>

</body>
</html>
作成したファイルを以下のように配置:
ドキュメントルート ---+--- index.html
                      |
                      +--- SampleApp/ ---+--- index.php
                                         |
                                         +--- templates/ ------ index.tpl
                                         |
                                         +--- templates_c/
                                         |
                                         +--- configs/
                                         |
                                         +--- cache/
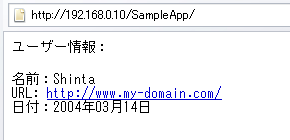
Web ブラウザで、http://<server-name>/SampleApp/index.php へアクセスすると以下のように表示されます。

さて、ここでちょっと気になるのが、このままでは Web ブラウザからテンプレートファイルや設定ファイルが覗かれてしまいます。そこで、テンプレートファイルや設定ファイルをドキュメントルートの外に配置しましょう。テンプレートファイルや設定ファイルは、Smarty のライブラリがアクセスできれば良いのでドキュメントルート内に無くても動作するようになっています。ただし、キャッシュファイルは Webサーバー(httpd) が作成するのでオーナーとパーミッションには注意してください。
配置方法は、Smartyクラスのプロパティ $template_dir, $compile_dir, $config_dir, $cache_dir によってそれぞれ設定することが出来ます。また、この設定は Smartyを使用する各アプリケーションごとに区別して設定する事が推奨されています。
それでは、Web サーバの設定が以下の状態と仮定して設定してみましょう。
| ドキュメントルート | /webservers/www.mydomain.com/htdocs |
| アプリケーションSampleAppの場所 | /webservers/www.mydomain.com/htdocs/SampleApp |
| テンプレートを置く場所 | /webservers/www.mydomain.com/smarty |
| SampleAppの Smarty用の場所 | /webservers/www.mydomain.com/smarty/SampleApp |
| SampleAppのテンプレートを置く場所 | /webservers/www.mydomain.com/smarty/SampleApp/template |
| SampleAppのキャッシュを置く場所 | /webservers/www.mydomain.com/smarty/SampleApp/template_c |
| SampleAppの設定ファイルを置く場所 | /webservers/www.mydomain.com/smarty/SampleApp/configs |
| SampleAppのキャッシュを置く場所 | /webservers/www.mydomain.com/smarty/SampleApp/cache |
ロジック・ファイル index.php を修正:
<?php
require_once('Smarty/Smarty.class.php');

// create object
$smarty = new Smarty;

// template, cache, configuration files
$smarty->template_dir = '/webservers/www.mydomain.com/smarty/SampleApp/templates/';
$smarty->compile_dir  = '/webservers/www.mydomain.com/smarty/SampleApp/templates_c/';
$smarty->config_dir   = '/webservers/www.mydomain.com/smarty/SampleApp/configs/';
// $smarty->cache_dir = '/webservers/www.mydomain.com/smarty/SampleApp/cache/';

// assign some content.
$smarty->assign('name', 'Shinta');
$smarty->assign('url', 'http://www.my-domain.com/');

// display it
$smarty->display('index.tpl');

?>
ファイルを以下のように配置:
... ---+--- htdocs/ ---+--- index.html
       |               |
       |               +--- SampleApp/ ---+--- index.php
       |
       +--- smarty/ ---+--- SampleApp/ ---+--- templates/ ------ index.tpl
                                          |
                                          +--- templates_c/
                                          |
                                          +--- configs/
                                          |
                                          +--- cache/
これで安全に、Smarty を利用できるようになります。キャッシュファイルを格納するディレクトリは Webサーバー(httpd) が作成するのでオーナーとパーミッションをきちんと設定してください。
Smarty のロジック部は、おおよそ以下のような構成で記述します。
<?php

// ライブラリの読み込み
require_once('Smarty/Smarty.class.php');

// オブジェクトの生成
$smarty = new Smarty;

// Smarty の設定
$smarty->caching = true;
$smarty->compile_check = false;
$smarty->template_dir = '......./templates/';
$smarty->compile_dir  = '......./templates_c/';
$smarty->config_dir   = '......./configs/';
$smarty->cache_dir    = '......./cache/';

// ロジック
$smarty->assign('name', 'Shinta');
$smarty->assign('url', 'http://www.my-domain.com/');

// 表示
$smarty->display('index.tpl');

?>
テンプレート部は、HTML内に動的に埋め込む変数は { } で囲んで指定します。
これで、必要最低限の設定は行えています。Smarty には、開発に便利なプロパティ($debugging, $compile_check, ...)が用意されているので活用すると良いでしょう(詳細はドキュメントを参照してください)。また、API についてもここで説明できないぐらい多いのでドキュメントを参照してください。
patTemplate
Template Engine の入手
patTemplate は、http://trac.php-tools.net/patTemplate から入手できます。入手したアーカイブを展開すると、include というディレクトリーに patTemplate のエンジンが入っています(ファイル一つのみ)。
インストール
patTemplate のエンジンは、どこに置いても構いませんが PHP がサーチできるパス (include_path)に置くか、インストールしたディレクトリを php.ini の include_path に追加すると良いでしょう。 ここでは、include_path = ".:/usr/local/lib/php" となっているとして、/usr/local/lib/php/pat にエンジンをインストール(コピー)します。
# gzip -dc patTemplate-2.4.tar.gz | tar xf -
# cd patTemplate-2.4
# mkdir /usr/local/lib/php/pat
# cp include/patTemplate.php /usr/local/lib/php/pat/
patTemplate の利用
patTemplate を利用する場合、はじめに patTemplate.phpを読み込みます。そして、patTemplate のインスタンスを生成することで利用可能になります。
require_once('pat/patTemplate.php');
$tmpl = new PatTemplate();
PHP で include_path = ".:/usr/local/lib/php" と設定してあり、/usr/local/lib/php/pat ディレクトリにエンジンをインストールしたので上記のように patTemplate.phpを読み込みます。
どうしても、 patTemplate.php が No such file or directory となる場合、フルパスで指定してください。
require_once('/usr/local/lib/php/pat/patTemplate.php');
$tmpl = new PatTemplate();
エンジンの設置が完了したら、次に、patTemplate の設定を行います。patTemplate の場合は、テンプレートファイルのディレクトリを設定するぐらいです。
// configuration
$tmpl->setBasedir('templates');
テンプレートファイルのディレクトリを上記のように設定した場合、以下のようになります。アプリケーションのメインである index.php の場所に注目してください。
ドキュメントルート ---+--- index.html
                      |
                      +--- patSample/ ---+--- index.php
                                         |
                                         +--- templates/
ここで、きちんと patTemplate が動作するかサンプルを作ってみましょう。以下の内容で、ロジック・ファイル index.php を作成:
<?php
require_once('pat/patTemplate.php');

// create object
$tmpl = new PatTemplate();

// template directory
$tmpl->setBasedir('templates');

// load template file
$tmpl->readTemplatesFromFile('index.tmpl.html');

// assign some content.
$tmpl->addVar("mainBody", "NAME", "Shinta");
$tmpl->addVar("mainBody", "URL",  "http://www.my-domain.com/");

// display it
$tmpl->displayParsedTemplate('main');

?>
以下の内容で、テンプレート・ファイル index.tmpl.html を作成:
<patTemplate:tmpl name="main">

<patTemplate:tmpl name="header">
<html>
<head>
<meta http-equiv="Content-Type" content="text/html; charset=EUC-JP">
<title>User Info</title>
</head>
<body>
</patTemplate:tmpl>

<patTemplate:tmpl name="mainBody">
<p>ユーザー情報:</p>
名前:{NAME}<br>
URL: <a href="{URL}">{URL}</a><br>
</patTemplate:tmpl>

<patTemplate:tmpl name="footer">
</body>
</html>
</patTemplate:tmpl>

</patTemplate:tmpl>
作成したファイルを以下のように配置:
ドキュメントルート ---+--- index.html
                      |
                      +--- patSample/ ---+--- index.php
                                         |
                                         +--- templates/ --- index.tpml.html
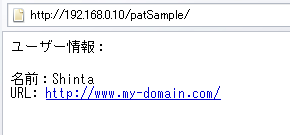
Web ブラウザで、http://<server-name>/patSample/index.php へアクセスすると以下のように表示されます。

patTemplate のロジック部は、おおよそ以下のような構成で記述します。
<?php

// エンジンの読み込み
require_once('pat/patTemplate.php');

// オブジェクトの作成
$tmpl = new PatTemplate();

// テンプレートを置くディレクトリの指定
$tmpl->setBasedir('templates');

// テンプレートの読み込み
$tmpl->readTemplatesFromFile('index.tmpl.html');

// ロジック
$tmpl->addVar("mainBody", "NAME", "Shinta");
$tmpl->addVar("mainBody", "URL",  "http://www.my-domain.com/");

// 表示
$tmpl->displayParsedTemplate('main');

?>
テンプレート部は、部品化したいHTMLの部分を<patTemplate:tmpl> </patTemplate:tmpl>タグで囲みます。HTML内に動的に埋め込む変数は、 { } で囲んで大文字で名前を入れます。
これで、必要最低限の設定は行えています。API については、ここで説明できないぐらい多いのでドキュメントを参照してください。
Smarty と patTemplate を比較
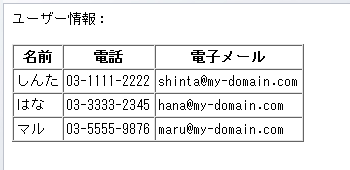
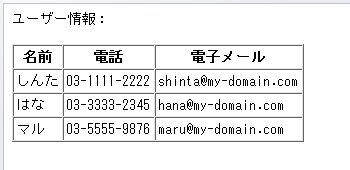
動的にテーブルのセルを表示するような場合、テンプレートを利用するとどのように見やすくなるかそれぞれのテンプレートで比較してみましょう。
| Smarty | patTemplate |
<?php // エンジンの指定 require_once('Smarty/Smarty.class.php'); // オブジェクトの作成 $smarty = new Smarty; // テンプレートファイル $smarty->template_dir = '/path/templates/'; $smarty->compile_dir = '/path/templates_c/'; $smarty->config_dir = '/path/configs/'; // ロジック $data = array( array('name' => 'しんた', 'tel' => '03-1111-2222', 'email' => 'shinta@my-domain.com'), array('name' => 'はな', 'tel' => '03-3333-2345', 'email' => 'hana@my-domain.com'), array('name' => 'マル', 'tel' => '03-5555-9876', 'email' => 'maru@my-domain.com') ); $smarty->assign('contacts', $data); // 表示 $smarty->display('table.tpl'); ?> |
<?php // エンジンの指定 require_once('pat/patTemplate.php'); // オブジェクトの作成 $tmpl = new PatTemplate(); // テンプレートファイル $tmpl->setBasedir('templates'); // テンプレートの読み込み $tmpl->readTemplatesFromFile('table.tmpl.html'); // ロジック $data = array( array('name' => 'しんた', 'tel' => '03-1111-2222', 'email' => 'shinta@my-domain.com'), array('name' => 'はな', 'tel' => '03-3333-2345', 'email' => 'hana@my-domain.com'), array('name' => 'マル', 'tel' => '03-5555-9876', 'email' => 'maru@my-domain.com') ); $tmpl->addRows('contacts', $data); // 表示 $tmpl->displayParsedTemplate('main'); ?> |
<html>
<head>
<meta http-equiv="Content-Type"
content="text/html; charset=EUC-JP">
<title>User Info</title>
</head>
<body>
<p>ユーザー情報:</p>
<table border="1" cellpadding="3" cellspacing="0">
<tr><th>名前</th>
<th>電話</th>
<th>電子メール</th>
</tr>
<tr><td>{$contacts[cell].name}</td>
<td>{$contacts[cell].tel}</td>
<td>{$contacts[cell].email}</td>
</tr>
</table>
</body>
</html> |
<html> <head> <meta http-equiv="Content-Type" content="text/html; charset=EUC-JP"> <title>User Info</title> </head> <body> <p>ユーザー情報:</p> <table border="1" cellpadding="3" cellspacing="0"> <tr><th>名前</th> <th>電話</th> <th>電子メール</th> </tr> <tr><td>{NAME}</td> <td>{TEL}</td> <td>{EMAIL}</td> </tr> </body> </html> |

|
 |
ロジックとテンプレートの比較をわかりやすくするために、細かい設定は省略しています。ちょっと簡単なサンプルですが、ロジック部はほとんど違いが無く、デザイン部となるテンプレートの記述に特徴があることがわかると思います。
おまけ:Smartyを拡張してみよう
毎回、テンプレートの場所やキャッシュの場所の設定を記述するのも面倒なので、Smartyのクラスを拡張してみます。
テンプレートやキャッシュの場所のルートディレクトリを指定することで設定が行える
静的ファイルを生成するメソッドの追加
表示するHTMLをきちんと charsetを設定して displayを行える
<?php
/**
 * Smarty 拡張クラス
 *
 * - Smarty のデフォルト環境を設定<br>
 * - 静的ページ作成用メソッドの追加<br>
 */
require_once("Smarty/Smarty.class.php");

define("_ERROR_URL",    "http://www.gadgety.net/");

/**
 * Smarty を継承し、ジェネレータ用のメソッドと 漢字コードを設定したHTMLページを
 * 表示するメソッドを追加
 */
class MySmarty extends Smarty {
    /**
     * 出力ファイル名
     *
     * @access  private
     * @var     string
     * @see generate(), halt()
     */
    var $sGenFilename = "";

    /**
     * コンストラクタ - Smarty の環境を設定
     *
     * @access  public
     * @param   string  $sDirTop            Smarty作業ディレクトリー
     */
    function MySmarty($sDirTop="") {
        // 親クラスのコンストラクタ
        $this->Smarty();

        if ($sDirTop) {
            $this->template_dir = $sDirTop . "/templates";
            $this->compile_dir  = $sDirTop . "/templates_c";
            $this->config_dir   = $sDirTop . "/configs";
            $this->cache_dir    = $sDirTop . "/cache";
        }
    }

    /**
     * ジェネレート - テンプレートをもとに、HTML ファイルを作成する
     *
     * @access  public
     * @param   string  $sTemplateFilename  テンプレートファイル
     * @param   string  $sGenFilename       ジェネレート先ファイル
     * @return  bool    true:成功 false:失敗
     */
    function generate($sTemplateFilename, $sGenFilename) {
        $this->sGenFilename = $sGenFilename;

        // ディレクトリがない場合は作成
        $sDirName = dirname($this->sGenFilename);
        if (!is_dir($sDirName)) {
            // -p: 存在しない場合は親ディレクトリを作成
            //exec("mkdir -p $sDirName");
            mkdir($sDirName, 0777, true);
        }

        // テンプレート置換後のデータ
        $sContents = $this->fetch($sTemplateFilename);

        // ページ生成
        $fp = fopen($this->sGenFilename,"w");
        if (!$fp) {
            $this->halt("ERROR: Can not open ".$this->sGenFilename."\n");
            return false;
        } else {
            fputs($fp, $sContents);
            fclose($fp);
            return true;
        }
    }

    /**
     * エラー処理 - エラーが発生した場合、処理を中断する。
     *
     * @access  public
     * @param   string  $sMsg               エラーメッセージ
     */
    function halt($sMsg) {
        echo "ERROR: Generating ".$this->sGenFilename.".\n";
        if (isset($sMsg)) {
            echo "$sMsg\n";
        }
        exit;
    }

    /**
     * エラーページ表示 - エラー原因を表示する
     *
     * @access  public
     * @param   string  $sMsg               エラーメッセージ
     * @param   string  $sTemplates         テンプレートファイル
     */
    function show_error($sMsg, $sTemplate) {
        $this->assign("message", $sMsg);
        $this->display($sTemplate);
        exit;
    }

    /**
     * ページ表示 - クライアントに表示データを返す
     * 親クラスのdisplayメソッドにヘッダの送出などを追加
     *
     * @access  public
     * @param   string  $sTmplFile          テンプレートファイル名
     * @param   string  $sCompileId         デフォルトは null
     * @param   string  $sCharset           デフォルトは UTF-8
     */
    function display($sTmplFile, $sCompileId=null, $sCharset="utf-8") {
        header("Cache-Control: private");
        header("Expires: Sun, 12 Jan 1997 20:00:00 GMT");
        header("Pragma: no-cache");
        header("Content-Type: text/html;charset=".$sCharset);

        $sFile = $this->template_dir."/".$sTmplFile;

        // テンプレートファイルが見つからないor読み込めない場合
        if (!file_exists($sFile) or !is_readable($sFile)) {
            // CAUTION: 遷移先を必要に応じて変更してください。
            header("Location: "._ERROR_URL);
        } else if (empty($sCompileId)) {
            parent::display($sTmplFile);
        } else {
            parent::display($sTmplFile,$sCompileId);
        }
    }
}

?>


